Automating ZAP DAST Scans using GitHub Actions
Run a DAST Scan using ZAProxy
Following is an example GitHub Action to run a ZAProxy (DAST) scan on an application, saving the results as an SARIF artifact or alternatively you could send the results directly to an ASPM Platform.
This example leverages the official zaproxy/action-af Action for running ZAP Automation Framework plans. The action requires a file path to the Automation Framework plan to run.
Getting Started
The first step to performing a DAST scan is to create a ZAP Automation Framework plan. You can clone my repo https://github.com/mokuso/zap-af for a copy of the templates used in this post. The ZAP Automation Framework is a powerful tool that allows you to automate the process of running security scans against your web applications. It provides a flexible and extensible framework for configuring and executing scans, as well as generating reports in various formats.
Create a configuration file for the ZAP Automation Framework
The action below uses the .github/workflows/zap/zap-env.yaml file to configure the ZAP Automation Framework. This file should be created in your repository using the example below as a starting point.
env:
  contexts:
  - name: baseline
    urls:
    - ${TARGET_URL}
    # includePaths:
    # excludePaths:
    # authentication:
        # method:  # String, one of 'manual', 'http', 'form', 'json' or 'script'
  parameters:
    failOnError: true
    progressToStdout: false
jobs:
- type: passiveScan-config
  parameters:
    enableTags: false
    maxAlertsPerRule: 10
- type: spider
  parameters:
    maxDuration: 5
- type: passiveScan-wait  # Passive scan wait for the passive scanner to finish
  parameters:
    maxDuration: 5
- type: report
  parameters:
    reportDescription: ''
    reportDir: /zap/wrk/
    reportFile: dast.sarif
    reportTitle: ZAP Scanning Report
    template: sarif-json
See https://www.zaproxy.org/docs/automate/automation-framework/ for more information on configuring the ZAP Automation Framework plan.
In this example we are utilizing the SARIF (Static Analysis Results Interchange) report format to present scanning results. As DAST scans are not static they can’t be directly mapped to individual lines of code in the original source file but only to a specific URL or endpoint of the application. Becasuse of this, the SARIF report cannont be uploaded into GitHub Code Scanning. However, the SARIF report can be uploaded to other ASPM platforms for further analysis and reporting.
Setup the Github Action to run a scan
Setup the required secrets and variables.
- Navigate to Repo Settings -> Secrets and Variables -> Actions
- Select Variables then New repository variable and add the following:
- TARGET_URL - the value should be set to the Target URL you want to scan.
- Then select Secrets then New repository secret and add the following:
- ZAP_AUTH_HEADER_VALUE - The Authorization header value (If needed).
Create the Github Action.
- Create the dast.yml file under Actions -> New Workflow then choose set up a workflow yourself.
- Replace main.yml with a meaningful name e.g. dast.yml
- Paste the script below into the file contents:
name: DAST Scan

on:
  # Scan on-demand through GitHub Actions interface:
  workflow_dispatch: {}
  # Schedule the CI job (this method uses cron syntax):
  schedule:
    - cron: '33 13 * * 4' # Sets schedule to scan every Wed at 13:33 UTC.
    # It is recommended to change the schedule to a random time.

jobs:
  dast-run:
    runs-on: ubuntu-latest

    steps:
      # Fetch project source with GitHub Actions Checkout.
      - uses: actions/checkout@v4

      - name: ZAP Scan using Automation Framework
        uses: zaproxy/[email protected]
        env:
          TARGET_URL: $
          #ZAP_AUTH_HEADER: Authorization
          #ZAP_AUTH_HEADER_VALUE: xxx
        with:
          plan: '.github/workflows/zap/zap-env.yaml'
          docker_env_vars: |
            TARGET_URL

      - name: 'Save Scan Artifact'
        uses: actions/upload-artifact@v4
        with:
          name: dast.sarif
          path: dast.sarif.json
          retention-days: 30

      #- name: 'Send File to ASPM Platform'
      #  run: |
      #    curl -sS -X POST \
      #      --url https://api.endpoint.url/v1/scanner/upload-file \
      #      --header "content-type: multipart/form-data" \
      #      --header "x-api-key: $" \
      #      --form [email protected]
- Commit changes.
- Run the scan by clicking on the Actions tab and selecting the DAST Scan workflow then clicking on the “Run workflow” button.
Conclusion
The above example demonstrates how to run a DAST scan using the ZAP Automation Framework and GitHub Actions. The results are saved as an SARIF artifact, which can be manually downloaded or sent to an ASPM platform for further analysis. By automating the DAST scan process, you can ensure that your web applications are regularly tested for security vulnerabilities, helping to protect your organization from potential threats.
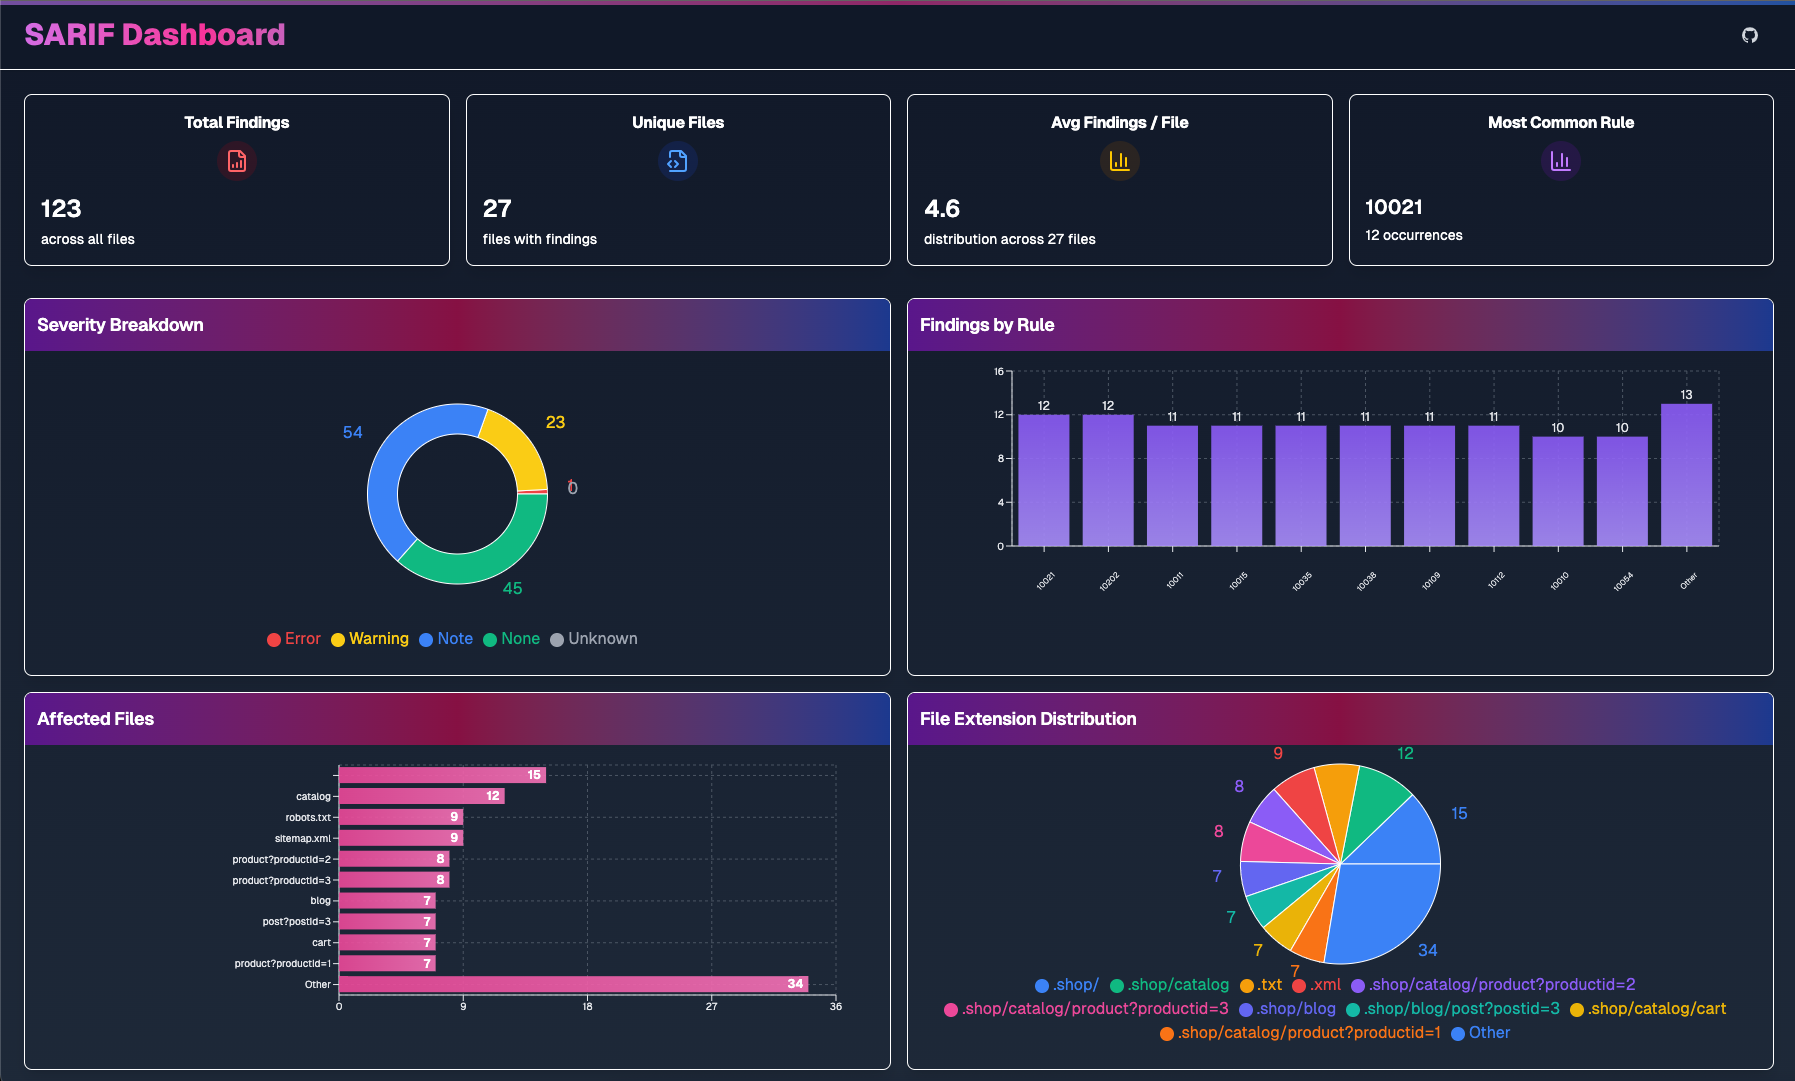
If you don’t have an existing ASPM platform you can also try out Caleb Kinney’s SARIF Dashboard to visualize the results locally within in your browser.
